Some of the detail contains technical terms, but don't let that concern you. These are for the fine detail which you are unlikely to need to know about although that information can be useful for those wanting to know it.
Login
In order to make changes you need to have been given a user id and password which you use to log in to the site via the Login link at the top right of the screen. After login some more links appear on the screen.
- A Shortcuts bar appears above the page title with links to help with maintenance
- A set of tabs will appear under the title to enable you to undertake actions you are now allowed to perform
Each user is given access to what changes they can make according to roles assigned to that user. So whilst administrators can do a lot of things the Local History team can just change the nodes in the Local History section.
Of course there is a bit of terminology used to describe the facilities provided by the Drupal software used to manage this site. The web pages the user sees can be produced in a number of ways, the basic way is via a set of text and other fields used to produce a page.These items are called nodes.
Creating/Editing nodes
To add a new node, click the 'Add content' link in the shortcuts bar or to edit an existing node click the 'Edit' tab below the node title when viewing it. Nodes consist of a set of fields holding different types of information with rules defined to set how the they should be displayed, and some are actually hidden. We can can have different node types with different sets of fields but currently for simplicity we just have a single 'Basic page' node type.
When you are in the edit/create screen the various fields are displayed with their current contents. A few will be marked with a red star to indicate that they must contain some content. A primary example of this is the Title. There is frequently help text beneath each field describing what it is used for an the type of information it can hold.
The main fields you are likely to work on when editing a node are:
- Title
- Body - The text that is displayed when somebody view the page.
- Images - Images that are displayed below the title which appear as a slide show
- Small images - A set of thumbnails containing most of the pictures. These can be clicked to show more detail about them. There is no method to add a click to the images in the slide show so those should be added here as well.
- Map - This only appears if you have added an icon or a boundary marking where the place is or was located.
The remaining fields are mainly internal and are used to help describe how a page is displayed. For example District defines which list in Local History this node is automatically added to.
Field types
Fields are defined as different types with different ways of changing the data in them and most are very easy to determine what to do. The Title is plain text and you just type the words in the box. Some are Select lists where you just select one of the items in the list provided. Others are handled in a different way.
Section
The section is used to control in which section of the site users can edit nodes. When creating nodes users can choose any section but specifying the wrong one will mean other users in the group cannot edit that node. This field is also used by the code that automatically chooses the url for a new node and this affects the appearance of the breadcrumb trail.
Sub-section
The sub-section is a device used when we want to have multiple nodes for a place where there is a lot of information. The items in the list are defined by an admin and this also defines the extra level placed within the url.
District
The District defines which portion of the town a place in the local history section is located and is used to add that node into the list of history pages for that town. It needs to only be specified within the Local History section of the web site.
Heritage Status
Some of the more important buildings are listed and we use this field to mark them. Some may also be marked as being a Heritage Asset. We can find these on the the Heritage Asset map. For listed buildings there is also a link to the description of why they are listed. Click the triangles on the map to get to that page and copy and paste that into the Heritage Details field. There does not seem to be a link for details of the individual Heritage Assets. We can thus build up a good list of all those things in Lytham marked in this way so that if there is a threat to them all the information about them is ready to hand.
Image Handling
Handling digital images is a little more complicated as we need to associate more information with the picture such as a Title and Date. Then it needs to be sized and displayed in different ways in different parts of the page. So images are stored in the Media library along with the associated information rather than within the node itself. That means all the related information only needs to be defined once and the same image can be used in multiple pages. For each image we have a Title, Date, Copyright and Notes field along with a few more fields to help manage the library contents and make it easier to select images held in there. We intend to use the media library as a repository for images of Lytham and when uploading images there we should try and upload the best quality and highest resolution copies that are available. Facebook and other platforms automatically reduce the resolution to reduce the size of the images which isn't what is required for an archive.
Images need to be in the media library before they can be added into pages although you can upload them as part of the process. We intend to add a good selection of images to the library but if ones you would like to use are not there yet then try asking somebody else who has them to do an upload.
We can add images in the Image, Body, and Small images fields each of which display them in slightly different ways.
Images
The first Images field is where we put a small number of images to give an overall impression of the place. Thees are automatically shown one by one as a Slideshow. The Slideshow can only display the title, whilst elsewhere in other fields it is designed to show the Title and Date fields beneath the image. The display of the images is responsive so they are automatically resized to fit the device you are viewing them on, whether it is a phone or a large screen. When you click on the image (apart from within the Slideshow) it shows a page just containing the image, the Title, Date, Copyright and Notes field so the user is provided with more information about the image. If you click on the image within that page it shows just the image at full size and resolution.
Body
As you may know web pages are defined using html and the Body field is one in which you can influence the html that is used, e.g. to have some text appearing as italic However you don't need to understand html as the editor does that for you. You just type text in the box provided and then you can select some text and use the icons in the box above to select the formatting to use. Very similar to editing a Word file.
We can also include images within the Body text by clicking the 'Insert from media library' button, and then selecting an appropriate display format. In most cases 'Medium' is best for that as it provides a thumbnail sized image.
Small images
There may be a significant number of images for some pages and these are best handled via this field where each one is displayed in a table of thumbnails. Clicking on them shows the full image and any additional information we have about it. Include any images recorded in the Images field here as well. It is most useful to arrange these in date order providing a timeline of the history. Drag and drop the images you have placed here to re-order them. Save the page after re-ordering as a move to another form in-between, such as adding other images, loses the order.
Map
Adding markers to the map to make it visible is done via icons on the map. You can use the Layers icon at the top right of the map to chose which background map to use when determining the location. Then click the one below it labelled 'Draw marker' to do that by clicking on the map where the marker should appear. To move an icon that isn't in the right place click 'Edit layers' which lets you drag and drop the marker into the right place. In a few cases it is useful to draw a boundary line when it is for something occupying a large area. 'Draw polygons' lets you do that.
URL
The url is the address of the web page which people use to get directly to it and is usually shown in a box near the top of the display in the web browser. Rather than making it a requirement for you to define an appropriate value when creating a new node there is a system in place to do this automatically. The starting point is the Section and for local history pages the District and then it uses the Title. This defines the text between the slashes in the url.
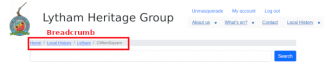
This information is also used in the Breadcrumb which is the part of the displayed page just below the top bar with a grey background. This is the url broken down into parts with the Title for that part shown rather than the letters in the url. This makes it easy for user to jump levels in our hierarchy of pages.
If a node has long title this technique can lead to rather long urls and so there is an option to tailor the url into something shorter if ther is a need for that. Thes best way is to first save the node and then edit it. At the bottom of the screen is a field for setting the url. Uncheck the box that says 'Generate automatic URL alias' and then change the last part of the url (generated from the title) in the box below and this will then change when you save it. Avoid doing this when the node has been there for some time as it is best practise not to change urls.
Revisions
When you edit a node we keep a copy of the last five versions so that if something is deleted by mistake we can go back to the previous version. If you are not marked as the Author of that node it may require an admin to do that. We can see a list of the revisions by clicking the Revisions which sites near Edit. That shows who made the changes and when. It also provides the ability to compare a pair of revisions to highlight the changes that have been made.